Backfilling
Modern home construction has made backfilling more demanding. Taller foundation walls, tighter lots, and more complex drainage requirements mean the margin for shortcuts has shrunk. We've seen what bad backfilling looks like from the inside — which is why we plan every job with the homeowner before a machine arrives on site.
Planning Your Project
Before work begins, we sit down with you to map out the full scope — material placement, staging areas for displaced soil, and a realistic timeline from start to finish. The jobs that go smoothly are the ones where nothing is a surprise.
Here's what that planning conversation covers:
- Timeline from start to completion — accounting for foundation complexity, framing sequencing, and weather.
- Material staging — where displaced material goes during the job, and what happens to any leftover fill when it's done.
- Site access and landscaping impact — which areas will be affected and how we'll manage them.
- Permits and utility identification — making sure everything is cleared before equipment arrives.
| Section | Planning — beside or below the checklist |
| Psych job | Safety + Trust. Show a real person the buyer can imagine talking to before they pick up the phone. |
| Visual type | Person in Context |
| Description | A crew lead or estimator on a residential site with a homeowner, both looking at a foundation or reviewing something on a phone or clipboard. Relaxed posture, not looking at camera. Concrete foundation wall or framed house visible behind them. |
| Mood | Warm, grounded, approachable, real |
| Avoid | Staged handshakes, hard-hat stock poses, anyone who looks like a model |
| Placement | Right of the circleList on desktop, below it on mobile. |
How Long Will a Backfill Take?
Honestly, it depends on your project. Foundation size, wall height, site access, drainage complexity, and weather all play a role.
Standard residential
Complex layout
Tall walls / staged fill
Accurate to your job
Tall foundation walls require the backfill to be done in stages — we wait for framing to catch up and reinforce the structure before adding more material. This prevents lateral pressure from cracking or bowing the exterior walls. It adds time. It isn't optional.
For an accurate estimate specific to your project, contact us for a free quote.
Preparing Your Site
Heavy equipment needs room to work. A few hours of preparation before we arrive protects your property and keeps the job on schedule. You can expect excavators and bobcats displacing significant material around the foundation — we'll need a temporary staging area, and some disruption to surrounding landscaping is unavoidable. We'll walk through exactly what to expect during planning.
- Clear the perimeter of the foundation. Remove debris, thick foliage, plants, or obstacles that would restrict access for excavators and bobcats.
- Mark all buried utilities. Clearly flag any utilities running near the foundation. Call BC 1 Call (or your local utility locate service) in advance — this protects your services and keeps the job safe.
- Confirm your permits are in order. Check with your city or local building department before we arrive. Requirements vary by municipality and some areas require specific permits or pre-inspections for residential backfilling.
| Section | Preparing Your Site — beside the checklist |
| Psych job | Clarity + Safety. Show what the site looks like at the point of arrival so the buyer knows what to expect. Reduces anxiety about disruption. |
| Visual type | Environment / Space |
| Description | A cleared residential lot perimeter — poured concrete foundation visible, earth around it cleared of debris and vegetation. No machinery yet, or machinery just arriving at the gate. Clean sight lines, morning light. BC residential streetscape visible in background if possible. |
| Mood | Organised, prepared, real, pre-work |
| Avoid | Chaotic debris-heavy sites, anything that looks like a demolition or disaster scene |
| Placement | Right of checklist on desktop. Below checklist on mobile, full-width. |
The Backfilling Process — Step by Step
| Section | Process Step 1 |
| Psych job | Authority + Safety. Show the drainage system being installed so the buyer can see this is a real, specific process — not just words. |
| Visual type | Process / In Progress |
| Description | Perimeter drain pipe being laid against the base of a concrete foundation wall. Hands or boots visible. Drain rock partially covering the pipe. Close enough to see the pipe and gravel clearly. |
| Mood | Methodical, precise, real |
| Avoid | Aerial or wide shots with no detail, generic "pipes in ground" stock imagery |
| Placement | Right of step text on desktop. Below step text on mobile. |
Install perimeter drains and downspout pop-ups.
This is the foundation of the entire drainage system — the first thing in before anything is covered. Perimeter drains direct snowmelt, rainwater, and groundwater away from your home's foundation permanently. Get this wrong and everything built over it inherits the problem.
| Section | Process Step 2 |
| Psych job | Proof + Authority. Specificity signals expertise. The buyer needs to see the actual material, not just read about it. |
| Visual type | Detail / Close-Up |
| Description | A tight shot of drain rock (coarse crushed stone, 3/4" or similar) being poured or placed over a drain pipe beside a foundation wall. The texture and size of the rock should be clearly visible. |
| Mood | Precise, quality-signalling, real |
| Avoid | Generic gravel pile with no context, out-of-focus texture shots |
| Placement | Right of step text on desktop. Below step text on mobile. |
Cover the drain pipe with drain rock.
A coarse, porous layer of drain rock goes over the pipe. It protects against damage from debris, soil, and root intrusion, while keeping water flowing freely to the drain. This is the layer most budget jobs skip or reduce — and where long-term problems start.
| Section | Process Step 3 |
| Psych job | Authority. Shows the detail work that separates a proper job from a cheap one. |
| Visual type | Process / In Progress |
| Description | Geotextile filter cloth (white or grey fabric) being unrolled and folded over drain rock beside a foundation wall. Hands clearly visible placing the cloth. The fabric texture and the rock beneath should both be visible. |
| Mood | Careful, methodical, professional |
| Avoid | Generic fabric rolls with no context, anything that looks like landscaping fabric |
| Placement | Right of step text on desktop. Below step text on mobile. |
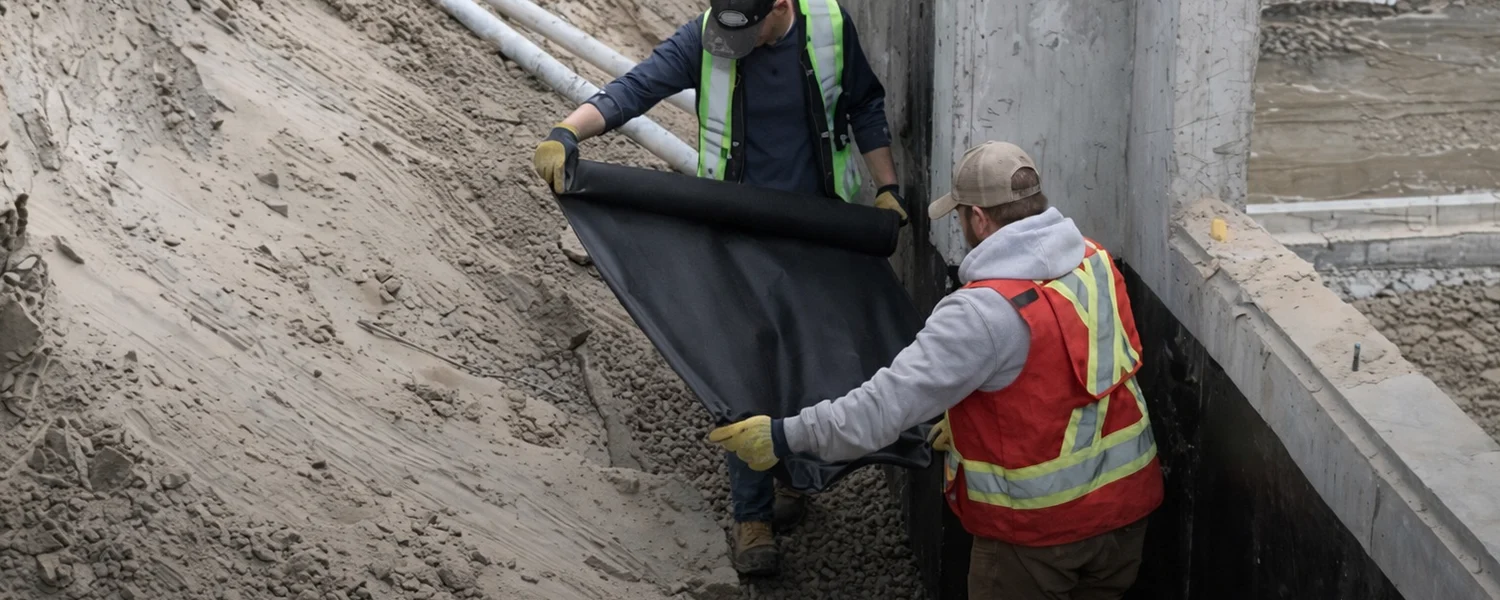
Cover the drain rock with filter cloth.
Geotextile filter cloth (polyester or polypropylene fabric) is laid over the drain rock. It prevents fine sediment from migrating down into the drainage system over time, which would eventually cause blockages. This is a 20-year protection measure, not an optional add-on.
| Section | Process Step 4 |
| Psych job | Proof + Safety. Show the final fill stage so the buyer understands what "compacted in lifts" actually looks like. |
| Visual type | Process / In Progress |
| Description | A bobcat or plate compactor working a layer of City Spec fill material against a residential foundation. Operator visible. The layered fill and foundation wall should both be in frame. Active, mid-task shot. |
| Mood | Capable, active, methodical, real |
| Avoid | Static empty equipment, wide shots with no human scale, anything that looks posed |
| Placement | Right of step text on desktop. Below step text on mobile. |
Fill and compact in 12" lifts.
With the drainage system sealed and protected, we fill with City Spec — a sand-and-rock blend engineered for drainage and compactability. Every 12 inches of material is compacted before the next layer goes in. For tall foundation walls, this stage is sequenced with your framing crew to avoid placing excess lateral pressure on the structure.
In Summary
Backfilling is literally the foundation of your home's future. The drainage you install now determines whether your foundation stays dry in 5 years, 10 years, and 20 years. It deserves the same attention as any other part of the build.
Working with us from concept to completion is how we make sure nothing gets missed:
- Planning the timeline and sequencing with your build schedule.
- Permits and utility identification — handled before machines arrive.
- Site access, equipment requirements, and landscaping impact — agreed upfront.
- Material staging and leftover fill disposal — planned in advance, not figured out on the day.
- Potential hurdles reviewed — weather windows, material delivery, framing coordination.
Don't hesitate to contact us with any questions or to schedule a free estimate for your backfilling project.
Backfilling — Top FAQs
How much does backfilling cost?
Cost depends on the size of the area, depth of fill, drainage complexity, and site access. Residential projects typically range from a few hundred to several thousand dollars. The only accurate number comes from seeing the site — which is why we offer free, no-obligation estimates. Don't book a job based on a rough ballpark.
How long does the backfilling process take?
Standard residential projects typically complete in 2 to 14 days. Simple, open-access sites come in at the lower end. Tall foundation walls requiring staged fills coordinated with your framing crew take longer. We'll give you a realistic timeline before work begins — not a number we adjust later.
What size of crush do you use?
We use City Spec — a sand-and-rock blend engineered for drainage and compactability in residential applications. For drainage layers, we typically use 3-inch crush or bank run, depending on the depth and load requirements of the specific project. The exact spec is confirmed during site assessment.
What is filter cloth and why does it matter?
Filter cloth (geotextile fabric) is made of polyester or polypropylene fibres. It sits between the drain rock and the fill material above it, preventing fine soil from migrating down and clogging the drainage system over time. It's a relatively inexpensive material that prevents a very expensive long-term problem.
| Section | Between FAQ and final call box |
| Psych job | Safety. The last image before the buyer acts. A human face reduces final-step anxiety — the outcome has already been shown, now the image just needs to make contacting feel easy. |
| Visual type | Person in Context — direct, approachable |
| Description | A single crew member or owner facing camera with a relaxed, confident expression. On-site context behind them — foundation, equipment, or residential street. Not a studio headshot. Real environment, natural light. |
| Mood | Warm, direct, trustworthy, real |
| Avoid | Studio portraits, crossed-arms poses, forced hard hat and vest, anything that looks like stock |
| Placement | Centred above the callBoxContainer, max-width 600px. On mobile full-width. |